Brother Toner Cartridges Troubleshooting
Do I shake the cartridge prior to installation to my printer?
Prior to installation gently rock the cartridge from side to side 2 to 3 times to allow the powder to move into position before printing. You will not need to repeat this process once the cartridge is installed as most cartridges contain a mechanical paddle which agitates the powder during the printing process.
I am trying to insert the cartridge(s) into my printer but they won’t fit.
First check to make sure you have purchased the correct cartridges for your printer.
Remanufactured and compatible cartridges often do look a slightly different shape and may often be a tighter fit but they will fit into the printer the same as the original cartridges.
If the cartridge(s) still won’t fit then make sure you are placing the cartridge into the correct slot.
I have fitted the cartridge and no print appears on the paper.
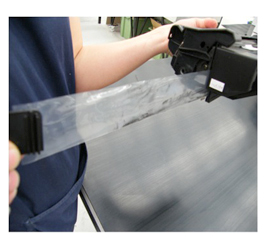
Some cartridges are fitted with removable seals to prevent toner leaking from the product. Simply pull the detachable plastic seal from the side of the cartridge fully to release the toner (see below).

I am getting Light Prints.
Check the printer has not been inadvertently switched to econo-mode. Make sure you check the print quality setting, the density setting and the retention setting of your machine (see your printer manual for how to check these).
I am getting a Low Toner Message
Make sure the seal was removed.
Has an empty toner been put into the machine? Was the bag and box sealed when you opened it? Empty toner cartridges have a typical pattern of fading print in the middle of the page.
I am getting Image defects including vertical lines or streaks
Remove the cartridge(s) from the printer and clean the metallic drum on the front of the cartridge. Try to rotate the drum to ensure its left clean all the way around
If the printer has a separate image drum or photoconductor unit the most likely cause of image defects other than the toner is the drum. Many laser printers have a maintenance kit, Image drum unit, which includes the fuser, transfer roller and paper pick-ups.
These imaging drum units only have a limited page life and need to be replaced when an image problem occurs.
I am getting a shaded background on the page when printing
A shaded background can be caused by a toner cartridge that is not firmly seated, or if the printer drum rollers/cartridge interface are dirty. Gently clean both the toner drum roller and the surface of the toner cartridge well with a soft, lint-free cloth.
There are random blotches on the printed paper.
The waste bin of the cartridge is full. Remove the cartridge and clean it out
The printer does not do anything after replacing a toner cartridge.
First of all, make sure that all packing material has been removed. Sometimes a small sticker can be overlooked which leads to problems with the print. A second common problem is debris in the printer interfering with the cartridge. Finally, hard as it is to believe, a lot of people actually forget to properly lock the toner cartridge into place and ensure the lid is shut.
I am getting a printer error message on initial cartridge installation
First check if the cartridge is the correct model for your printer
Take the cartridge out of the printer and check all the packaging has been removed from the cartridges
When the printer is still on, pull the power cable out the back of the printer and leave the printer off for 15 minutes. This process is to reset the printer memory
If the cartridge contains a micro chip, while the cartridge is out of the printer give the chip a good wipe with a tissue or cloth.
Ensure that the inside of the printer is clean and that there are no sensors that have been covered with toner powder.
Wait for at least 15 minutes and then turn the printer back on and insert the cartridge, making sure that it is clicked firmly into place in the slot within the printer
This will reset the printer and in most cases it will resolve the issue.
I have inserted a set of cartridges and I am getting a printer error message
First we need to identify which cartridge is causing the problem.
If you place all of your old working cartridges back into the printer. Then change each cartridge one by one to locate which new cartridge is causing the error
Contact our customer service team so we can get the faulty item replaced.
I have installed the cartridge and the toner level indicator is not active and reads low
To avoid patent infringements the design of the memory chip may differ from the original product. Some laser toner cartridges when installed will not display the memory status bar of your printer display. This does not affect the performance of the cartridge and you may continue to print normally.
The cartridge appears to be running low sooner than it should based on factory page yield estimates.
Factory page yield estimates are based on average 5% text/graphics coverage on the page. If you are printing graphics or heavy text applications, coverage will be more than 5%. For example, if you coverage is 10%, your cartridge will run out in half the number of pages specified in the factory page yield
Below is a couple of examples with different fonts and spacing of what 5% coverage of a page looks like.
As you can see this coverage does not necessarily represent a typical print for an average user. So it is worth keeping in mind the page yield listed for your cartridge does not necessarily mean you will get that many pages from your cartridge.
How many prints you get out of your cartridge will depend on a number of factors including Size of font you use, Size of font you use, Weight of font you use, Width of page border, and Addition of extras such as graphs, images or simple lines
General troubleshooting
The best way to determine whether a problem is with a toner cartridge or the laser printer is to replace the toner cartridge. You may either switch toners with another machine in your office that uses the same toner or put in your back-up toner. If switching the cartridge corrects the problem or if the problem follows the cartridge to the other machine, then the toner cartridge was most likely the problem.
Brother known issues
Poor print quality – Occasionally the corona wire on the drum needs to be cleaned if you notice poor print quality. This can be done by removing the drum unit from the machine and sliding the small blue or green knob on the top of the drum unit back and forth several times and then reinstalling the unit into the machine
I have replaced a Brother cartridge in my printer but it is still not recognised.
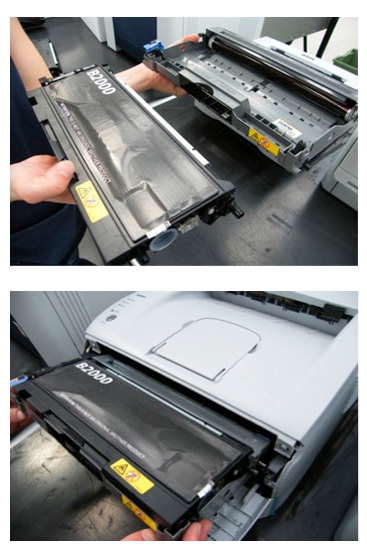
Some Brother cartridges are supplied in two halves:
1. The toner tank hopper unit
2. The Drum unit. (see below)
Both components attach to each other within the printer. The printer will prevent you from printing if the drum unit has reached the end of its life. You may need to replace the drum unit.

