Lexmark Ink Cartridge Troubleshooting (without printhead)
I have inserted one cartridge into my printer and I am receiving an error telling me that the cartridge is missing or faulty?
First make sure you have purchased the correct cartridge for your printer.
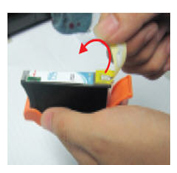
Take the cartridges out of the printer and make sure all the packaging, clips and tape has been removed from the cartridge
Then while the printer is on pull the power cable out the back of the printer and leave the printer off for 15 minutes. Doing this will give your printer chance to clear the error
If the cartridge contains a micro chip, while the cartridge is out of the printer give the chip a good wipe with a tissue or cloth.
Turn the printer back on and firmly reinsert the cartridges making sure they are fully clicked into place.
If a full set of cartridges has been purchased then place all the new cartridges in the printer at the same time.
I have inserted a full set of cartridges into the printer at the same time and receive an error message telling me that cartridges are missing or faulty?
Follow the instructions as above.
If the problem persists then place all your old cartridge back into the printer and change the cartridges individually one by one. This should identify which cartridge is causing the error.
I have inserted my cartridge(s) and the print quality is bad or there is no ink at all appearing on the paper.
These cartridges are simply a plastic tank that holds the ink. They have no affect with regards to the printing quality which is determined by the print heads situated inside your printer.
If the print quality is poor or no ink is appearing on the paper then try doing 2-3 head cleans/nozzle cleans through your printer software to help the flow of ink leaving around 20 minutes between each clean. During this rest period, ink from the cartridge will migrate through the cartridge and absorb / push any trapped air from the print head.
My ink cartridge printed one or two pages and then stopped printing.
The tape that covers the breathing hole was not removed. Be sure the breathing hole on the cartridge has been released usually by removing a small “rip strip” so that the cartridge has air supply then it can print.

I have just inserted my new cartridge(s) and the ink levels on my computer are showing low or empty.
It is normal for the ink levels to show low or empty when using compatible cartridges. Please ignore the ink levels and print as normal. All the cartridges are checked before they are dispatched to ensure they are completely full.
I am trying to insert the cartridge(s) but they are physically a different size or shape.
Compatible cartridges will always look different to the original branded cartridges.
They will often differ in shape or size but this does not affect the fitting or functionally of the cartridges in any way at all.
The cartridge appears to be running low sooner than it should based on factory page yield estimates.
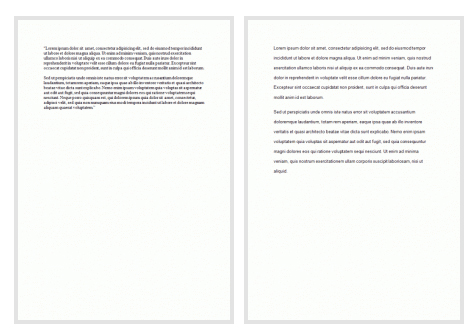
Factory page yield estimates are based on average 5% text/graphics coverage on the page. If you are printing graphics or heavy text applications, coverage will be more than 5%. For example, if you coverage is 10%, your cartridge will run out in half the number of pages specified in the factory page yield
Below is a couple of examples with different fonts and spacing of what 5% coverage of a page looks like.

As you can see this coverage does not necessarily represent a typical print for an average user. So it is worth keeping in mind the page yield listed for your cartridge does not necessarily mean you will get that many pages from your cartridge.
How many prints you get out of your cartridge will depend on a number of factors including Size of font you use, Size of font you use, Weight of font you use, Width of page border, and Addition of extras such as graphs, images or simple lines.
Lexmark 100XL and 108XL compatible not being recognised by the printer
1. Tear off the yellow tape
2. Remove the protection clip
3. Install in the printer
4. Click the cartridge into place and close lid
Method one:
1. Remove the cartridge and install the used or new OEM cartridge. Then close the printer cover
2. When the printer stops after detecting, take out the OEM cartridge.
3. Reinstall in the printer & repeat steps if required.
Method two:

1. If the cartridge is not recognized
2. Remove the cartridge
3. Gently cut off the black carbon article allowed to disconnect
4. Reinstall in the printer & repeat steps if required
Attention
1. Do not press hard on either side of the cartridge when removing the yellow tape.
2. Do not turn the cartridge upside down once the yellow tap and clip have been removed.
3. A gentle scratch should be enough to remove the excess carbon.
4. Please perform nozzle test, if nay break lines or stripes appears, please clean the nozzle.
